
3 Simple and Ingenious Chocolate Ideas to Decorate Your Ice Cream and Desserts
;Resize,width=742;)
Chocolate decorations are an easy way to take a simple bowl of ice cream to the next level. Ice cream is always a crowd-pleaser, and with these decorations, you’ll feel confident enough to serve a bowl of ice cream at your next dinner party. Not only is it easy, but it’s also affordable—much cheaper than store-bought decorations! To make the chocolate decorations, you will need chocolate (use your favorite melting chocolate!), a bowl of ice water, a skimmer, and a wooden stick. Once you create your preferred decoration, it can either be set in a bowl of ice water (this works great if you’re in a hurry!), or set in the refrigerator for 20 minutes. The decorations are easy to make ahead of time, and the possibilities are endless!
Chocolate Decorations Through History
While chocolate bars seem like a newer invention, drinking chocolate has been consumed for years. In fact, The Mexicans and Aztecs used to brew a bitter concoction that was usually enjoyed on special occasions. The type of chocolate we eat today was first created by Richard Cadbury. His surname should sound familiar to you. Way back in 1861, he created the first eating cholate. And it was by no means plain! The chocolates were packaged in a heart-shaped box decorated with roses and cupids.
Tips
For the chocolate swirl, feel free to use other sprinkles. Rainbow sprinkle sprinkles, dried coconut flakes, freeze-dried fruit, or other crushed nuts will all work well.
If you want to add sprinkles to the flower decorations, then leave it to set in the fridge.
Simply using melted chocolate will work, but if you want your decorations to be firm and glossy, it’s always best to use tempered chocolate. Tempering involves heating the chocolate to a certain temperature, then cooling it down again until it reaches a certain temperature point. The chocolate will end up smooth and shiny, and it won’t melt as easily.
To temper the chocolate, you will need a thermometer. Heat the chocolate over a double boiler, until it reaches the correct temperature. Then continue stirring while it cools down again to the right temperature (see below).
- For dark chocolate, the melting temperature is 122 – 131°F (50 – 55°C) and the cooling temperature is 88 – 90° F (31 – 32°C).
- For milk chocolate, the melting temperature is 113 – 122°F (45 – 50°C) and the cooling temperature is 86 – 88° F (30 – 31°C).
- For white chocolate, the melting temperature is 113 – 122°F (45 – 50°C) and 84 – 86°F (29 – 30°C).
Get creative and make your own designs. Look in your kitchen for utensils you can use to make fun designs. Think outside the box!
Ingredients
How To Make Chocolate Decorations
Floral Chocolate Decoration:
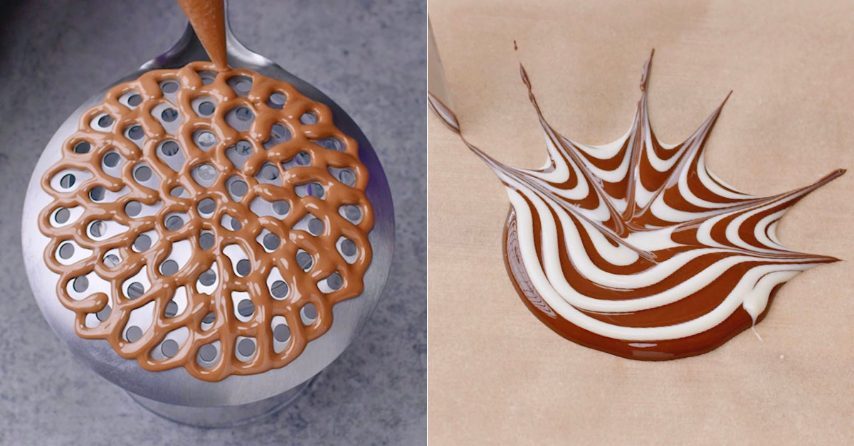
Place a stainless steel skimmer upside down on a clean surface. Using a piping bag with melted milk chocolate, carefully pipe the chocolate around each hole in the skimmer.

Continue until all the holes are covered.

Carefully dip the skimmer with the chocolate into a bowl of ice water. Gently swirl it around until the hardened chocolate decoration falls off.

Remove the chocolate decoration and allow the excess water to drip off.

Place the decoration in a bowl of ice cream and enjoy!

Swirl Chocolate Decoration:
Place a clean, wooden popsicle stick on a sheet of wax paper. Pipe swirls of chocolate around the tip of the wooden stick.

Sprinkle the chocolate swirl with pistachio grains. Leave to set in the refrigerator for 20 minutes.

Use the chocolate swirls to decorate an ice cream sundae.

Starburst Chocolate Decoration
Pipe a bit of dark chocolate onto a clean sheet of wax paper.

Using a piping bag filled with white chocolate, pipe swirls of white chocolate onto the dark chocolate.

Use a knife (or wooden skewer) to create a starburst pattern.

Leave to set in the refrigerator for 20 minutes, then break the starburst in half.

Use to decorate an ice cream sundae.

How To Store Chocolate Decorations
The chocolate decorations can be made ahead of time and stored in the fridge for up to 3 days. Make sure to keep it in an airtight container.


;Resize,width=767;)
